Introduction
Not too long ago I determined that a demon-prince model that I was working on would look great with bird wings. This seemed like it would be a daunting task at first, but after looking at some other wing sculpts as well as reference photos of bird wings online, I realized that there was a rational pattern that I could follow to aid in this project. The concept of building a bird wing sculpt up from a shaped armature was one that I learned from Sandra Garrity one year at Gencon. She was working on a wing for a Pegasus sculpt, and while watching her sculpt with green-stuff, I could still see the brass plate armature that she was applying the putty to. This was a good point of reference for me to start my own wing sculpt.
Reference material & anatomy of a bird’s wing
Google is your friend when you want some anatomy reference material. I found some fantastic images of birdwings that I could use to help me create this sculpt. This is the image I used for this example:

This reference can be used to not only see how the bird’s feathers layer to create the wing, but also can be printed out to judge the scale of the wing against the scale of your model to determine if it is the correct size or not. Scale the image to the size you need, and print the image of the wing out. If you aren’t sure what size the wing aught to be, create several print outs at various sizes. Finally the very same printout can become the template for the armature you are about to create.
Create the armature
As I mentioned above, watching Sandra sculpt feathers onto a brass armature was a bit of an epiphany for me. The armature that you create does a lot of the heavy lifting for defining the shape of the wing.
I have been cutting my armatures out of plasticard as it is what I have had laying around. Pro sculptors use brass as it holds up to the galvanization process better than anything else. Cutting up brass sheet can be a bit of a hassle, and my wing models weren’t going to a foundry for mold-making, so plasticard was a good substitute. You can trace out the shape of the wing onto the plasticard, and then cut that shape out.
The armature can be a final test to see if the size of your wing is in proportion to the rest of the model. The plasticard of the wing can be bent gently to emulate the shape of the wing, and to keep it from being too flat.
How to make a feather
Here comes the bulk of the work that you will need to do to create your wing sculpt.
Once the basic shape of the feather is created, the first thing to do is to press in the line that represents the feather’s quill. Some sculpts use two lines to define the quill, but in my experience the feather looks cleaner if the quill is a simple, single line.
After the quill is pressed into the putty, gently press lines along the feather’s vane. These lines define the thin hairs that make up the surface of the feather. Press into the putty and pull gently away from the qill to give the feather a bit of an edge. Repeat this along the vane until each side of the quill is defined.
Sculpting each individual feather can be a bit daunting, but with a little patience, persistence, and some music, pod-cast, or movie on in the background you will get through the entire wing fairly quickly.
First layer of putty: Primaries, Secondary feathers
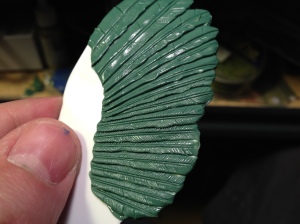
With this first layer of feathers you will see how the technique above is used to create feathers in sequence. First sculpt the basic vane shape of each of the feathers in this layer. This is done by making cuts in the putty…
and then to pull each vane down slightly with the spoon tool to create the proper amount of overlap.
Draw out each feather’s hairs with the edge of a spoon tool, or an hobby knife blade which has been dulled for sculpting. Once this first set of feathers has been completed let the putty set for an hour or two to give it some rigidity. This will help keep the sculpting of the next layer from accidentally messing up your hard work on the previous layer.
Next row of feathers
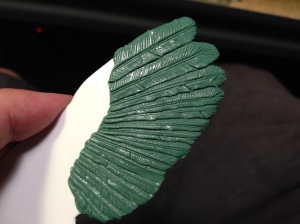
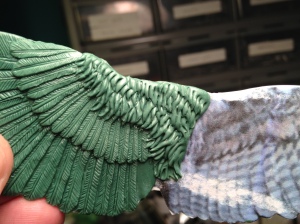
The next row of feathers represents the wing’s primary, secondary, and median wing coverts. This layer is accomplished in the same way as the first layer largely. This layer will cover most of the end of the wing up to the wing’s bend.
Apply putty to the wing, and press in lines to define the separate feathers. Plucking out small triangles of putty to make the tips pointy will help with the detail later on.
Press the inner edges of these proto-feathers down to create a layering effect.
Each feather needs quills just like the larger primary feathers.
These feathers are detailed in the same way as the larger feathers.
Final layer of feathers
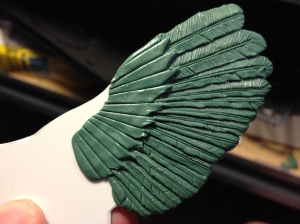
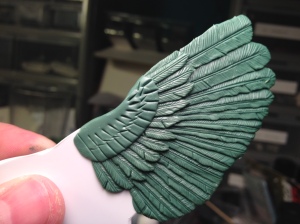
The final layer represents the bend of the wing, and the lesser wing coverts. These small feathers are the final part of this side of the wing. The lesser wing coverts require less work than the larger feathers, but there are more of them. having less details on these feathers helps keep the wing look clean, and natural. Once these have been sculpted, set the wing aside over night to fully set. Once it is totally set up, you can begin on the inside of the wing. The inside can be sculpted in an identical manner to the outside.
Sculpting the 3rd set of feathers is very similar to the other layers, only much of it can be done at once.
By pressing down on each feather, and pulling down slightly defines the wing’s base.
Refine these shapes, and clean up any little bits of putty which shouldn’t be there.

Quills pressed in as with other feathers.
Detail feathers.
The inside of an Owl’s wings has very furry feathers that help keep it silent as it swoops down upon it’s prey (Empire Swordsmen)!
Check out this article for a brief tutorial on sculpting hair, and fur.
Attaching the wing to your model
Once each side of both wings are sculpted, fully set, and cleaned up (you may want to do a little trimming around the edges of the feathers with a sharp hobby knife blade to remove excess putty), you can drill mounting holes into the wings and then pin them to the model. Once the pinning is complete some support can be added to the join between the wing and the model with putty. After this putty is set, add more feather detail over the join to blend the wing into the body of the model.
Feel free to ask any questions, or post any comments on this article! Thanks for reading!






Very well done and a simple tutorial to follow.
Tony
Nice. Very well explained and a handy reference point
This isn’t the first wings tutorial I’ve read but it’s a good one, you make it very easy to follow the steps. Very clear and precise.
Thank you very much. This article helped me immensely in my project.
What is plastic card?
http://www.frpgames.com/cart.php?m=product_detail&p=86327&ref=goog&gclid=CKaV3Zjv37sCFawRMwodhzQABw#.UsWOE7Qtnk8
Its card stock made from styrene plastic. There are a ton of vendors for it as well as places to get the stuff. Ebay, hobby stores, art supply stores, Amazon. Search for ‘plasticard’ or ‘plastic card’. Its great for model making.
Hi. I am going to attempt to do a bird sculpture for a project. I would like to know what materials (putty/clay) and paints you use. Thanks
I use ‘greenstuff’ by kneadatite. ‘Procreate’ (terrible name) is also very good. I know blick.com has greenstuff, but I order my stuff from an online gaming/hobby store called thewarstore.com. Try it out!
Also milliput is a lot like green stuff. It’s basicly the same
Beautiful! I love this tutorial! I use a lot of resin clay in my sculptures, and was wondering if “green stuff” is the same thing? I’ve never heard of it before. My clay is from avesstudio.com, and it’s called Apoxie Sculpt. You can see the results with a google search on my name. Cheers! Laurie Hassold
Greenstuff is similar to Apoxie Sculpt in several ways; 2 par epoxy, gets harder as it sets, ect. Its more rubbery than apoxie which is very rigid when it sets. You can mix the two to get variations on these properties. Thanks, Laurie, I’ll have to check out your work!
Great tutorial.
I’m currently attempting to make rtv molds for a pair of wings i’ve sculpted – partly inspired by this article. Have you made molds from the above sculptures ?
If so, do you have any tips or links to relevant info? I’m trying to decide whether to pour a solid block mold and then cut into it to make 2 parts, or to attempt to make a 2 part mold from scratch – but I think this could be tricky due to the complexity of the wing/feather outline on my originals.
Nice! Glad you liked the article! Id do a 2-part mold. Cut 1 part molds are better for thicker casts, and you may need many vents to avoid air pockets on the pointer feathers. Good luck & let me know how it works out!
wow, this was the most awesome craftsmanship in sculpting that I have seen ever…..you do great work!!!
I really enjoyed your tutorial! You did a fantastic job sculpting the wing along with explaining the how and why. You really captured a realistic looking wing with awesome detail!! Kudos!
Those wings look amazing! I hope I can make some using this tutorial.
What are some good modeling tools to use to work with green stuff? This will be my first major “sculpt” so I don’t own any tools besides a knife and files.
Also how hard is it to bend plasticard, and how far can you bend it without it breaking?
Great details! Id love to see the attaching process to the model youre working on (how the pining and masking play out).